How to make a great panorama photo with any digital camera
Part I / II: Heading out to take pictures
This tutorial is divided into two parts. This first part looks at the best way to take a panorama photo using multiple pictures taken on any digital camera. In the second part the individual photos are stitched together into a panorama photo using image editing software on your computer.
Panoramas and your digital camera
With the advance of digital cameras there is no need for special panorama cameras or lenses any more. It is possible to create great looking panoramas from multiple images taken with any digital camera by putting them together on a computer.The first step is making the separate photos. Many modern digital cameras offer a panorama setting that makes this even easier. Before you set out though, check how your camera records the panorama. Do not use the inbuilt setting if it combines the pictures into a single panorama in the camera. The quality of the automatic photo stitch functions I've seen leave much to be desired and, worst of all, they do not offer the opportunity to adjust the image manually at a later stage. It can be very frustrating if you believe you've taken the greatest panorama ever only to find out that there are visible connections between the photographs.
"Only use your cameras panorama function if it stores each individual photograph separate"
Ensure that you choose the panorama function that stores each separate photograph. If there is no separate option, use the camera as if it didn't have a panorama function. Because, even if your camera doesn't have a panorama function you can still create cool panoramas. You may just need to be a bit more careful when moving your camera from picture to picture.
Taking the panorama photo(s)
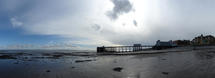
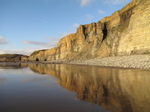
When taking a panorama photo, the aim is to take a series of photographs that overlap each other. Use your camera's panorama guide if it features one. If it doesn't, fix the exposure settings to give you an evenly lit end result, that avoid visible banding and gradients, which can be especially obvious in sky.When taking your panorama, each photo should ideally be perfectly level with all photos taken on the same horizontal plane.

Try to avoid angling the pictures. This will not only greatly reduce the size of the final panorama, but it also makes stitching the separate photos into a single panorama more difficult. It will require additional rotation of the images to get everything lined up.
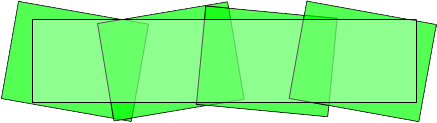
In this example the panorama requiring rotation is 21% smaller than the level panorama!
Keep the camera in the same position after taking each picture until you see the live preview on your camera's screen again. Then pick a point towards the edge of your scene and move your camera to the side. Move your camera on a horizontal plane keeping the horizon in the same position as the previous picture. Make sure that the point you picked is still visible to create an overlap between the two pictures. Repeat this process until you've finished your panorama.
View the pictures you've taken on your camera to ensure that the horizon is level and all pictures are on the same horizontal plane. Also ensure there is enough over lap between the pictures. If you spot mistakes take the whole panorama again.
To tripod or not to tripod
Using a tripod however has several advantages. It's easier to keep each picture level, the horizon will be on the same height in each picture and you automatically rotate the camera around a fixed point.Tips taking panorama photos
- Try a vertical panorama
- Use a rock, railing, bin or anything else solid as an alternative tripod for your panorama.
In practice however, I hardly ever use a tripod when taking panorama photos. Because I often take photos on hiking trips or other inaccessible places, and I find carrying a tripod is just too cumbersome. I also find that it can be difficult to see the screen of your digital camera on a low down tripod. It also makes taking panoramas on eye level difficult as you will need a very high tripod.
I recommend trying a few panoramas both with and without a tripod and see which results you like best.
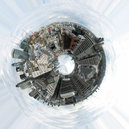
The next step is stitching the panorama photos together seamlessly into a astonishing panorama.